

Recently, I was lucky enough to migrate a PostgreSQL database cluster managed by Patroni to new hardware. At first blush, the task seemed easy – I didn’t expect to encounter any problems.
That said, I did encounter some unforeseen issues while migration was underway, which subsequently prompted me to share the lessons I learned. This article describes the practical steps and pitfalls of migrating a cluster to a new platform. The following software was used: PostgreSQL 11.13, Patroni 2.1.1, etcd 3.2.17 (API version 2).
With no further ado, let’s dive in!
Introduction
Patroni is a popular Python-based Open Source template for PostgreSQL by Zalando. It is designed to automate the deployment of high-availability clusters. At its heart, Patroni is a framework based on a streaming replication mechanism with the WAL (Write-Ahead Log) technique at its core. The central concept of the WAL is that all the changes are first logged and only at that point are they written to the database. After the WAL is written to, the DBMS invokes an fsync system call that flushes the data to the disk. Such a mechanism ensures data integrity in case of, e.g., a server crash. Once the server goes back online, the DBMS reads the most recent records from the WAL and applies the corresponding changes to the database.
Streaming replication transfers WAL records from the master to the replicas and applies them. With this replication setup, all the writes are performed on the master-server only. Meanwhile, reads may be completed from both the master and the replicas (the replica must be running in hot_standby mode). Since most queries to the DBMS are read requests, replication allows for horizontal scaling of the database. Streaming replication has two operation modes:
- asynchronous — data is immediately written to the WAL on the master and a “success” response is sent before the corresponding WAL records are transferred to the replicas;
- synchronous — data is written to the WAL on the master and at least one replica. This is a prerequisite for the transaction to be considered confirmed. (Note that specific criteria can be specified in the PostgreSQL settings.)
The configuration of a Patroni cluster is stored in a DCS (Distributed Configuration Store), enabling all cluster members to be aware of each other’s state. Any popular key-value store can be used (e.g., Consul, etcd v3, ZooKeeper) as a Patroni DCS. In this article, we will use the etcd distributed key-value store.
The objective and the initial state
While providing a customer with turnkey infrastructure maintenance, we encountered a rather frequent issue: their database running out of space. Meanwhile, there was no capacity to connect an additional drive to the physical server running in the data center. So what is the best course of action in that situation? The answer is pretty straightforward: you need to migrate the database to a new server while keeping the upcoming expansion in mind. In the end, three more capable physical servers were ordered for the migration.
The starting point:
- A Patroni PostgreSQL cluster consisting of three servers running in asynchronous replication mode;
- An etcd cluster (to store the Patroni state) consisting of three instances running on each of the Patroni cluster servers;
- A private network in the PostgreSQL environment with an address range of 192.168.0.0/24;
- A load balancer that routes traffic to the PgSQL cluster’s master node.
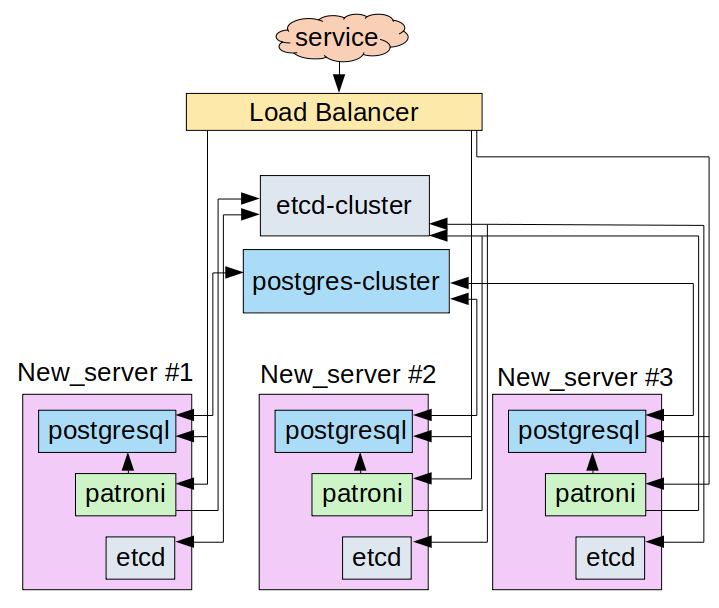
Note that for convenience’s sake, all further actions (as well as the bottlenecks configuration analysis) are performed in a sandbox. A schematic representation of the service interaction is shown below:
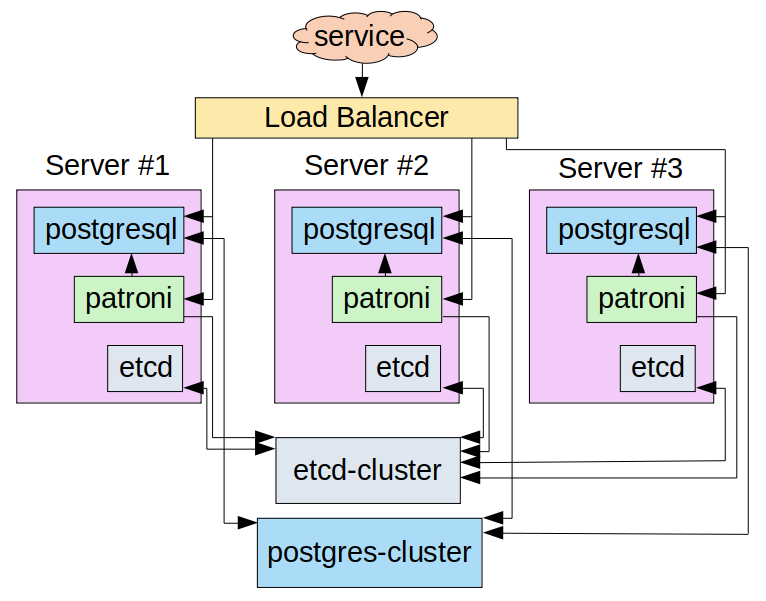
There is network connectivity between all the nodes and the load balancer (i.e., each node can connect to any other node using the IP address).
The /etc/hosts file on each node contains the following entries to render reading the configuration data easier:
# etcd
192.168.0.16 server-1 etcd1
192.168.0.9 server-2 etcd2
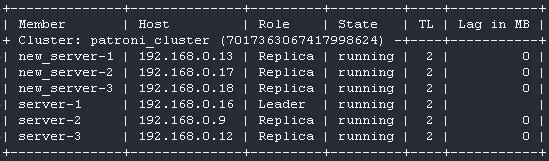
192.168.0.12 server-3 etcd3 Here is the status of the Patroni cluster:

The listing below shows the /etc/patroni.yaml config contents on the server-1 node:
scope: patroni_cluster
name: server-1
namespace: /patroni/

restapi:
  listen: 192.168.0.16:8008 # node's IP and port where Patroni API will operate
  connect_address: 192.168.0.16:8008
  authentication:
    username: patroni
    password: 'mysuperpassword'

etcd:
  hosts: etcd1:2379,etcd2:2379,etcd3:2379

bootstrap:
  dcs:
    ttl: 30
    loop_wait: 10
    retry_timeout: 10
    maximum_lag_on_failover: 1048576
    synchronous_mode: false
    postgresql:
      use_pg_rewind: true
      use_slots: true
      parameters:
        wal_level: hot_standby
        synchronous_commit: off
        hot_standby: "on"

  initdb:
  - encoding: UTF8
  - data-checksums

  pg_hba:
  - local all postgres trust
  - host postgres all 127.0.0.1/32 md5
  - host replication replicator 0.0.0.0/0 md5
  - host replication all 192.168.0.16/32 trust # server-1
  - host replication all 192.168.0.9/32 trust  # server-2
  - host replication all 192.168.0.12/32 trust # server-3
  - host all all 0.0.0.0/0 md5

  users:
    admin:
      password: 'mysuperpassword2'
      options:
        - createrole
        - createdb

postgresql:
  listen: 192.168.0.16:5432 # interface's IP and port where PostgreSQL will listen
  connect_address: 192.168.0.16:5432
  data_dir: /data/patroni
  bin_dir: /usr/lib/postgresql/11/bin
  config_dir: /data/patroni
  pgpass: /tmp/pgpass0
  authentication:
    replication:
      username: replicator
      password: 'mysuperpassword3'
    superuser:
      username: postgres
      password: 'mysuperpassword4'
    rewind:
      username: rewind_user
      password: 'mysuperpassword5'
  parameters:
    unix_socket_directories: '/tmp'

tags:
    nofailover: false
    noloadbalance: false
    clonefrom: false
    nosync: false
The status of the etcd cluster:

The /etc/default/etcd contents on the server-1 node:
ETCD_LISTEN_PEER_URLS="http://127.0.0.1:2380,http://192.168.0.16:2380"
ETCD_LISTEN_CLIENT_URLS="http://127.0.0.1:2379,http://192.168.0.16:2379"
ETCD_INITIAL_CLUSTER="etcd1=http://etcd1:2380"
ETCD_INITIAL_CLUSTER_STATE="new-cluster"
ETCD_INITIAL_CLUSTER_TOKEN="myclustertoken"
ETCD_DATA_DIR="/var/lib/etcd"
ETCD_ELECTION_TIMEOUT="5000"
ETCD_HEARTBEAT_INTERVAL="1000"
ETCD_NAME="etcd1"
ETCD_ADVERTISE_CLIENT_URLS="http://192.168.0.16:2379"
ETCD_INITIAL_ADVERTISE_PEER_URLS="http://192.168.0.16:2380"
Note: The /etc/default/etcd config file is used to bootstrap the etcd cluster. Thus, the parameters defined in it are applied during the initialization of the etcd process (first run). Once the cluster is initialized, the configuration is read from the directory specified by the ETCD_DATA_DIR parameter.
Our objective is to migrate the data from servers 1, 2, and 3 to the new servers without causing any downtime. To do this, we will gradually expand both the PostgreSQL cluster and the etcd cluster along with making minor adjustments to the configuration of the new nodes:
- The endpoints of the new servers will not be added to the load balancer;
- New PostgreSQL nodes will not participate in leader elections in the event of a failover.
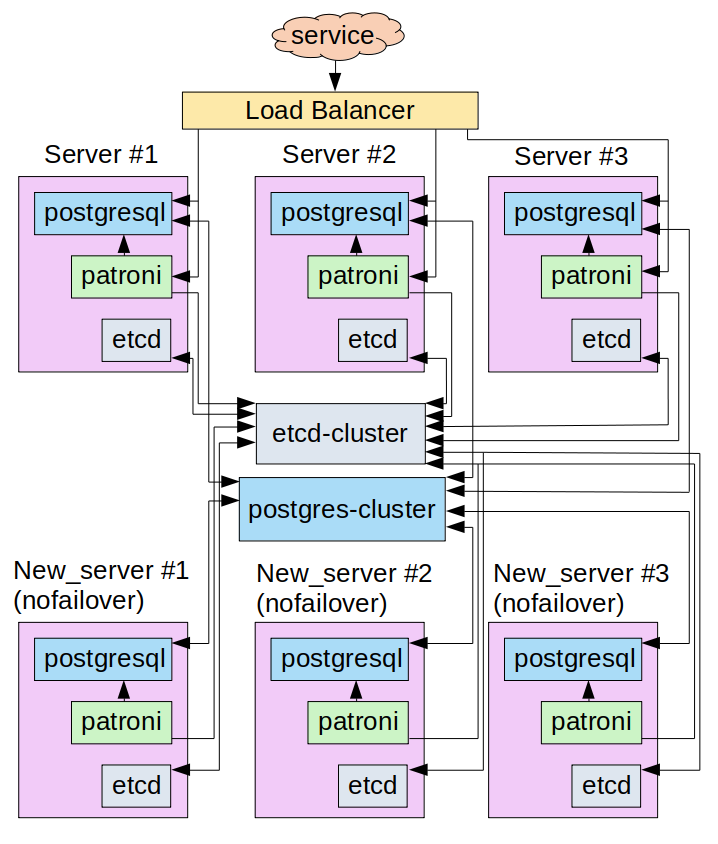
In our particular case, the nodes communicated over the Internet. We did not like this due to the potential security problems it could entail. So we set up a VPN using the tools the data center provided and ensured L2 connectivity between the nodes. I’ll skip over the details of this preparation phase. Instead, for simplicity’s sake, I will add the new servers to the 192.168.0.0/24 network to ensure that all the nodes communicate within the broadcast domain.
The temporary node interaction scheme in the cluster will go as follows:
Implementation
Here is a list of the steps to be completed:
- expansion of the etcd cluster;
- expansion of the PostgreSQL cluster using Patroni tools;
- the decommissioning the “old” nodes from the PostgreSQL cluster;
- the decommissioning the “old” instances from the etcd cluster;
Alright, let’s get started!
Step 1: Adding new nodes to the etcd cluster
Caution! Since etcd (or any other key-value store) is a component essential to Patroni’s operation, we recommend using separate instances and a dedicated subnet for the cluster to isolate it from the Patroni nodes. However, in my sandbox, I decided to save money and deploy an etcd cluster on the servers where the Patroni/PostgreSQL instances were running.
The first thing to do is to expand the etcd cluster so that all nodes (both new and old) can connect to the new leader when it is switched over. To do so, let’s first add the IP addresses of the new servers to the /etc/hosts file on each of the six nodes:
# etcd
192.168.0.16    server-1 etcd1
192.168.0.9     server-2 etcd2
192.168.0.12    server-3 etcd3
192.168.0.13    new_server-1 etcd-1	# the IP address of the first new server
192.168.0.17    new_server-2 etcd-2	# ... the second new server
192.168.0.18    new_server-3 etcd-3	# ... the third new server
Now it is time to add new instances to the etcd cluster. First, we have to check that the etcd service isn’t active on new_server-1 (192.168.0.13):
root@new_server-1:~# systemctl status etcd
● etcd.service - etcd - highly-available key value store
   Loaded: loaded (/lib/systemd/system/etcd.service; disabled; vendor preset: enabled)
   Active: inactive (dead)
     Docs: https://github.com/coreos/etcd
           man:etcd
To be on the safe side, let’s clear the /var/lib/etcd directory to make sure that the configuration will be retrieved from the /etc/default/etcd file:
root@new_server-1:~# rm -rf /var/lib/etcd/*Now let’s make the /etc/default/etcd file like this:
ETCD_LISTEN_PEER_URLS="http://192.168.0.13:2380,http://127.0.0.1:2380"
ETCD_LISTEN_CLIENT_URLS="http://192.168.0.13:2379,http://127.0.0.1:2379"
ETCD_INITIAL_CLUSTER_TOKEN="myclustertoken"
ETCD_DATA_DIR="/var/lib/etcd"
ETCD_ELECTION_TIMEOUT="5000"
ETCD_HEARTBEAT_INTERVAL="1000"
ETCD_ADVERTISE_CLIENT_URLS="http://192.168.0.13:2379"
ETCD_INITIAL_ADVERTISE_PEER_URLS="http://192.168.0.13:2380"
Switch to any of the etcd cluster servers (e.g., server-1) and display a cluster member list:
root@server-1:~# etcdctl member list
862db4122a92dc3: name=etcd3 peerURLs=http://etcd3:2379 clientURLs=http://192.168.0.12:2379 isLeader=false
46d7a702fdb60fff: name=etcd1 peerURLs=http://etcd1:2380 clientURLs=http://192.168.0.16:2379 isLeader=true
d129ecfd4c627e1f: name=etcd2 peerURLs=http://etcd2:2379 clientURLs=http://192.168.0.9:2379 isLeader=false
Add a new cluster member:
root@server-1:~# etcdctl member add etcd-1 http://etcd-1:2380
Added member named etcd-1 with ID 6d299012c6ad9595 to cluster

ETCD_NAME="etcd-1"
ETCD_INITIAL_CLUSTER="etcd1=http://etcd1:2380,etcd-1=http://etcd-1:2380,etcd2=http://etcd2:2380,etcd3=http://etcd3:2380"
ETCD_INITIAL_CLUSTER_STATE="existing"
Note the etcd parameters to be added to the new instance in order to connect it to the existing cluster. Add these parameters to /etc/default/etcd on the etcd-1 server (new_server-1). You will end up with the following configuration file (the last three lines were added to the original configuration):
ETCD_LISTEN_PEER_URLS="http://192.168.0.13:2380,http://127.0.0.1:2380"
ETCD_LISTEN_CLIENT_URLS="http://192.168.0.13:2379,http://127.0.0.1:2379"
ETCD_INITIAL_CLUSTER_TOKEN="myclustertoken"
ETCD_DATA_DIR="/var/lib/etcd"
ETCD_ELECTION_TIMEOUT="5000"
ETCD_HEARTBEAT_INTERVAL="1000"
ETCD_ADVERTISE_CLIENT_URLS="http://192.168.0.13:2379"
ETCD_INITIAL_ADVERTISE_PEER_URLS="http://192.168.0.13:2380"
ETCD_NAME="etcd-1"
ETCD_INITIAL_CLUSTER="etcd1=http://etcd1:2380,etcd-1=http://etcd-1:2380,etcd2=http://etcd2:2380,etcd3=http://etcd3:2380"
ETCD_INITIAL_CLUSTER_STATE="existing"
Check the state of the etcd cluster:
root@new_server-1:~# etcdctl member list
46d7a702fdb60fff: name=etcd1 peerURLs=http://etcd1:2380 clientURLs=http://192.168.0.16:2379 isLeader=true
6d299012c6ad9595: name=etcd-1 peerURLs=http://etcd-1:2380 clientURLs=http://192.168.0.13:2379 isLeader=false
c32185ccfd4b4b41: name=etcd2 peerURLs=http://etcd2:2380 clientURLs=http://192.168.0.9:2379 isLeader=false
d56f1524a8fe199e: name=etcd3 peerURLs=http://etcd3:2380 clientURLs=http://192.168.0.12:2379 isLeader=false
As you can see, etcd-1 has successfully joined the cluster. Repeat all the above steps for the next server. In the configuration template (/etc/default/etcd), replace the addresses of the network interfaces with the server address. You will end up with:
root@new_server-2:~# etcdctl member list
40ebdfb25cac6924: name=etcd-2 peerURLs=http://etcd-2:2380 clientURLs=http://192.168.0.17:2379 isLeader=false
46d7a702fdb60fff: name=etcd1 peerURLs=http://etcd1:2380 clientURLs=http://192.168.0.16:2379 isLeader=true
6d299012c6ad9595: name=etcd-1 peerURLs=http://etcd-1:2380 clientURLs=http://192.168.0.13:2379 isLeader=false
c32185ccfd4b4b41: name=etcd2 peerURLs=http://etcd2:2380 clientURLs=http://192.168.0.9:2379 isLeader=false
d56f1524a8fe199e: name=etcd3 peerURLs=http://etcd3:2380 clientURLs=http://192.168.0.12:2379 isLeader=false
… and the following /etc/default/etcd configuration file:
ETCD_LISTEN_PEER_URLS="http://192.168.0.17:2380,http://127.0.0.1:2380"
ETCD_LISTEN_CLIENT_URLS="http://192.168.0.17:2379,http://127.0.0.1:2379"
ETCD_INITIAL_CLUSTER_TOKEN="myclustertoken"
ETCD_DATA_DIR="/var/lib/etcd"
ETCD_ELECTION_TIMEOUT="5000"
ETCD_HEARTBEAT_INTERVAL="1000"
ETCD_ADVERTISE_CLIENT_URLS="http://192.168.0.17:2379"
ETCD_INITIAL_ADVERTISE_PEER_URLS="http://192.168.0.17:2380"
ETCD_NAME="etcd-2"
ETCD_INITIAL_CLUSTER="etcd-2=http://etcd-2:2380,etcd1=http://etcd1:2380,etcd-1=http://etcd-1:2380,etcd2=http://etcd2:2380,etcd3=http://etcd3:2380"
ETCD_INITIAL_CLUSTER_STATE="existing"
Do the same for the third server and check whether everything has gone smoothly:
root@new_server-3:~# etcdctl member list
40ebdfb25cac6924: name=etcd-2 peerURLs=http://etcd-2:2380 clientURLs=http://192.168.0.17:2379 isLeader=false
46d7a702fdb60fff: name=etcd1 peerURLs=http://etcd1:2380 clientURLs=http://192.168.0.16:2379 isLeader=true
6c2e836d0c3a51c3: name=etcd-3 peerURLs=http://etcd-3:2380 clientURLs=http://192.168.0.18:2379 isLeader=false
6d299012c6ad9595: name=etcd-1 peerURLs=http://etcd-1:2380 clientURLs=http://192.168.0.13:2379 isLeader=false
c32185ccfd4b4b41: name=etcd2 peerURLs=http://etcd2:2380 clientURLs=http://192.168.0.9:2379 isLeader=false
d56f1524a8fe199e: name=etcd3 peerURLs=http://etcd3:2380 clientURLs=http://192.168.0.12:2379 isLeader=false
The /etc/default/etcd configuration file is comprised of the following:
ETCD_LISTEN_PEER_URLS="http://192.168.0.18:2380,http://127.0.0.1:2380"
ETCD_LISTEN_CLIENT_URLS="http://192.168.0.18:2379,http://127.0.0.1:2379"
ETCD_INITIAL_CLUSTER_TOKEN="myclustertoken"
ETCD_DATA_DIR="/var/lib/etcd"
ETCD_ELECTION_TIMEOUT="5000"
ETCD_HEARTBEAT_INTERVAL="1000"
ETCD_ADVERTISE_CLIENT_URLS="http://192.168.0.18:2379"
ETCD_INITIAL_ADVERTISE_PEER_URLS="http://192.168.0.18:2380"
ETCD_NAME="etcd-3"
ETCD_INITIAL_CLUSTER="etcd-2=http://etcd-2:2380,etcd1=http://etcd1:2380,etcd-3=http://etcd-3:2380,etcd-1=http://etcd-1:2380,etcd2=http://etcd2:2380,etcd3=http://etcd3:2380"
ETCD_INITIAL_CLUSTER_STATE="existing"
Congrats, you’ve increased the number of etcd instances from three to six.
Step 2: Expanding the PostgreSQL cluster
Let’s now increase the number of nodes in the PgSQL cluster. Since Patroni manages our cluster, you have to create a /etc/patroni.yaml configuration file with roughly the following content:
scope: patroni_cluster
name: new_server-1
namespace: /patroni/

restapi:
  listen: 192.168.0.13:8008
  connect_address: 192.168.0.13:8008
  authentication:
    username: patroni
    password: 'mynewpassword'

etcd:
  hosts: etcd-1:2379,etcd-2:2379,etcd-3:2379

bootstrap:
  dcs:
    ttl: 30
    loop_wait: 10
    retry_timeout: 10
    maximum_lag_on_failover: 1048576
    synchronous_mode: false
    postgresql:
      use_pg_rewind: true
      use_slots: true
      parameters:
        wal_level: hot_standby
        synchronous_commit: off
        hot_standby: "on"

  initdb:
  - encoding: UTF8
  - data-checksums

  pg_hba:
  - local all postgres trust
  - host postgres all 127.0.0.1/32 md5
  - host replication replicator 0.0.0.0/0 md5
  - host replication all 192.168.0.16/32 trust # server-1
  - host replication all 192.168.0.9/32 trust  # server-2
  - host replication all 192.168.0.12/32 trust # server-3
  - host all all 0.0.0.0/0 md5

  users:
    admin:
      password: 'mynewpassword2'
      options:
        - createrole
        - createdb

postgresql:
  listen: 192.168.0.13:5432
  connect_address: 192.168.0.13:5432
  data_dir: /data/patroni
  bin_dir: /usr/lib/postgresql/11/bin
  config_dir: /data/patroni
  pgpass: /tmp/pgpass0
  authentication:
    replication:
      username: replicator
      password: 'mynewpassord3'
    superuser:
      username: postgres
      password: 'mynewpassord4'
    rewind:
      username: rewind_user
      password: 'mynewpassword5'
  parameters:
    unix_socket_directories: '/tmp'

tags:
    nofailover: true
    noloadbalance: true
    clonefrom: false
    nosync: false
Notes:
- Patroni’s etcd settings on the new servers are edited (see the
hostsin theetcdsection of the config) to reflect the fact that the “old” etcd instances will soon be removed from the cluster (that is, only the “new” endpoints will be specified in it). Suppose the server makes a request to the etcd-1 follower, and the leader is, say, etcd2 (its endpoint is omitted in the new Patroni configuration). In this case, etcd-1 will return the leader endpoint and, since all cluster members are aware of each other, the system will not be affected. - Two tags,
nofailover: trueandnoloadbalance: true, are set in the configuration. There are no plans to set new servers as load balancer’s targets yet, so we explicitly forbid them to participate in leader elections. - The
data_dirandconfig_dirparameters must be correctly set on the new servers. You are recommended to restore these variables’ original values. The point is that someone may explicitly specify paths to these directories in thepostgresql.base.conffile. In that case, when a new replica is bootstrapped, these parameters will end up on the new server. - You have to make sure that the
pg_hba.confconfiguration file is identical on all the nodes, and it contains permissive rules for connecting both new and old servers. These rules are defined inpatroni.yaml; however, they are only used during bootstrapping. Someone may modify the file later; meanwhile, Patroni won’t restore it to its original state. I ran into this crucial phenomenon during the migration.
Make sure that the /data/patroni directory is empty and owned by the postgres user. If that is not the case, clear the directory and set the necessary permissions:
root@new_server-1:~# rm -rf /data/patroni/*
root@new_server-1:~# chown -R postgres:postgres /data/patroni
Start Patroni and check the cluster state:
root@new_server-1:~# systemctl start patroni
root@new_server-1:~# patronictl -c /etc/patroni.yml list
The new replica is running. Great!
Note that during startup Patroni reads information from etcd, and if it finds a running cluster (as in our case!), it tries to bootstrap based on the leader. In doing so, it uses pg_basebackup. This operation can take a long time to complete if your database is large. For example, in a real-life scenario (on which this article is based), the size of the database was 2.8 TB, and it took about 10 hours to bootstrap it over a gigabit channel.
You also have to keep in mind that bootstrapping puts additional pressure on the network interface, so it is recommended to add new replicas during periods of minimum database usage.
After the new replica completes the bootstrap, repeat the procedure for the remaining servers. You should end up with the following configuration:
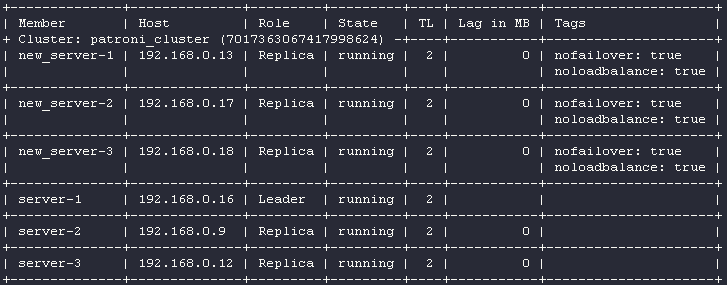
Caution! Each cluster node puts additional pressure on the leader because all the changes are pulled from it by default. This means that if the DB is under a heavy network load generated by the services, adding 3 replicas at once to the cluster may lead to undesirable consequences. In my case, an average leader’s network interface load was ~500 Mbps for outbound traffic with three cluster members. The fourth node increased the load, but there were no apparent peaks. However, the fifth node dramatically changed the situation: some nodes started lagging behind the leader (the Lag in MB parameter was constantly increasing). The explanation is straightforward: at this point, the load on the network interface peaked at its maximum (1 Gbit/sec).

I managed to solve this problem by enabling cascading replication. In this case, a new replica uses an existing one for bootstrapping. To set the replica as a replication source, add the tag clonefrom: true to it. The tag replicatefrom: <node_name> allows a replica to use any other replica as a source (you have to add it to the replica before bootstrapping). Together, these tags enable cascading replication in Patroni.
If your production database is under a heavy load, it is worthwhile to decommission the old replica (see step No. 4) after starting a new one (or enable cascading replication). This way, you can keep the total number of replicas down close to the minimum required.
A few notes on load balancing
Since we use a load balancer, before proceeding to the next steps, I’d like to explain how it makes routing decisions.
We used the following snippet in the Patroni configuration:
restapi:
  listen: 192.168.0.13:8008
  connect_address: 192.168.0.13:8008
  authentication:
    username: patroni
    password: 'mynewpassword'
It specifies the interface and the port for the Patroni API. The API can be used to determine whether a node is currently a leader or a replica. With this information, you can set up a health check for the load balancer to let it know what target to route traffic to when there is a new leader.
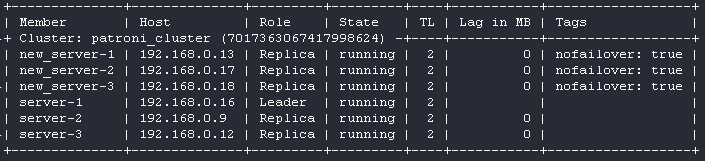
For example, the picture above shows that server-1 (192.168.0.16) is currently the leader. Let’s send a couple GET requests to the following URLs:
root@new_server-2:~# curl -I -X GET server-1:8008/leader
HTTP/1.0 200 OK
Server: BaseHTTP/0.6 Python/3.6.9
Date: Sun, 10 Oct 2021 11:40:38 GMT
Content-Type: application/json

root@new_server-2:~# curl -I -X GET server-1:8008/replica
HTTP/1.0 503 Service Unavailable
Server: BaseHTTP/0.6 Python/3.6.9
Date: Sun, 10 Oct 2021 11:37:57 GMT
Content-Type: application/json
They resulted in the 200 and 503 HTTP status codes, respectively. Let’s send a couple of similar requests to the Patroni API from the server that is not currently the leader:
root@new_server-2:~# curl -I -X GET new_server-1:8008/leader
HTTP/1.0 503 Service Unavailable
Server: BaseHTTP/0.6 Python/3.6.9
Date: Sun, 10 Oct 2021 11:41:14 GMT
Content-Type: application/json

root@new_server-2:~# curl -I -X GET new_server-1:8008/replica
HTTP/1.0 503 Service Unavailable
Server: BaseHTTP/0.6 Python/3.6.9
Date: Sun, 10 Oct 2021 11:41:17 GMT
Content-Type: application/json
In both cases, the server returned the 503 error. Why is that? That is because the noloadbalance: true tag was used. Let’s set it to false on new nodes and restart Patroni:
Once again, let’s send a couple requests to the Patroni API:
root@new_server-2:~# curl -I -X GET new_server-1:8008/leader
HTTP/1.0 503 Service Unavailable
Server: BaseHTTP/0.6 Python/3.6.9
Date: Sun, 10 Oct 2021 11:45:40 GMT
Content-Type: application/json

root@new_server-2:~# curl -I -X GET new_server-1:8008/replica
HTTP/1.0 200 OK
Server: BaseHTTP/0.6 Python/3.6.9
Date: Sun, 10 Oct 2021 11:45:44 GMT
Content-Type: application/json
Everything is fine now. By setting up a health check for the load balancer via the Patroni API, we can route traffic to the master node (for write requests) and to the replicas (for read requests). This comes very well.
The cloud provider’s load balancer was used in our case, and I didn’t have to do any deep configuring (other than setting up a health check). In general, you can use HAproxy in the TCP mode for load balancing. Below is its sample config:
global
    maxconn 100

defaults
    log global
    mode tcp
    retries 2
    timeout client 30m
    timeout connect 4s
    timeout server 30m
    timeout check 5s

listen stats
    mode http
    bind *:7000
    stats enable
    stats uri /

listen leader
    bind *:5000
    option httpchk
    http-check expect status 200
    default-server inter 3s fall 3 rise 2 on-marked-down shutdown-sessions
    server server_1 192.168.0.16:5432 maxconn 100 check port 8008
    server server_2 192.168.0.9:5432 maxconn 100 check port 8008
    server server_3 192.168.0.12:5432 maxconn 100 check port 8008
Step 3: Configuring the PostgreSQL cluster
Let’s get back to our case. We have added new replicas to the PostgreSQL cluster. It is time to allow all the cluster members to participate in leader promotion and set new endpoints as the load balancer’s targets. Set the nofailover tag to false and restart Patroni:
Add new servers to the load balancer’ target list and assign new_server-1 as the leader:
root@new_server-1:~# patronictl -c /etc/patroni.yml switchover
Master [server-1]:
Candidate ['new_server-1', 'new_server-2', 'new_server-3', 'server-2', 'server-3'] []: new_server-1
When should the switchover take place [now]: now
Current cluster topology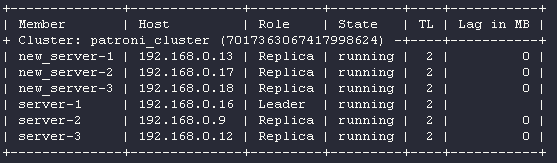
Are you sure you want to switchover cluster patroni_cluster, demoting current master server-1? [y/N]: y
Successfully switched over to "new_server-1"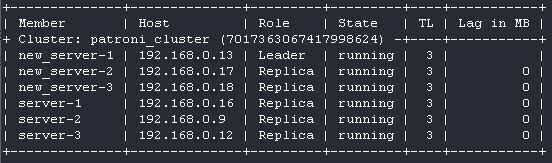
Step 4: Decommissioning servers from the Patroni cluster
Let’s decommission server-1, server-2, and server-3 from the cluster and exclude them from the load balancer’s target list (we no longer need them):
root@server-3:~# systemctl stop patroni
root@server-3:~# systemctl disable patroni
Removed /etc/systemd/system/multi-user.target.wants/patroni.service.

root@server-2:~# systemctl stop patroni
root@server-2:~# systemctl disable patroni
Removed /etc/systemd/system/multi-user.target.wants/patroni.service.

root@server-1:~# systemctl stop patroni
root@server-1:~# systemctl disable patroni
Removed /etc/systemd/system/multi-user.target.wants/patroni.service.
Check the cluster status:
root@new_server-1:# patronictl -c /etc/patroni.yml list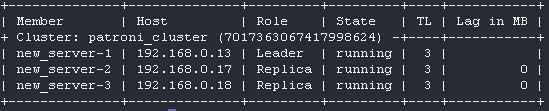
Only the new servers are running. We’re almost done!
Step 5: Whipping the etcd cluster into shape
The last step is to decommission the old etcd replicas:
root@new_server-1:~# etcdctl member list
40ebdfb25cac6924: name=etcd-2 peerURLs=http://etcd-2:2380 clientURLs=http://192.168.0.17:2379 isLeader=false
46d7a702fdb60fff: name=etcd1 peerURLs=http://etcd1:2380 clientURLs=http://192.168.0.16:2379 isLeader=true
6c2e836d0c3a51c3: name=etcd-3 peerURLs=http://etcd-3:2380 clientURLs=http://192.168.0.18:2379 isLeader=false
6d299012c6ad9595: name=etcd-1 peerURLs=http://etcd-1:2380 clientURLs=http://192.168.0.13:2379 isLeader=false
c32185ccfd4b4b41: name=etcd2 peerURLs=http://etcd2:2380 clientURLs=http://192.168.0.9:2379 isLeader=false
d56f1524a8fe199e: name=etcd3 peerURLs=http://etcd3:2380 clientURLs=http://192.168.0.12:2379 isLeader=false

root@new_server-1:~# etcdctl member remove d56f1524a8fe199e
Removed member d56f1524a8fe199e from cluster
root@new_server-1:~# etcdctl member remove c32185ccfd4b4b41
Removed member c32185ccfd4b4b41 from cluster
root@new_server-1:~# etcdctl member remove 46d7a702fdb60fff
Removed member 46d7a702fdb60fff from cluster
root@new_server-1:~# etcdctl member list

root@new_server-1:~# etcdctl member list
40ebdfb25cac6924: name=etcd-2 peerURLs=http://etcd-2:2380 clientURLs=http://192.168.0.17:2379 isLeader=true
6c2e836d0c3a51c3: name=etcd-3 peerURLs=http://etcd-3:2380 clientURLs=http://192.168.0.18:2379 isLeader=false
6d299012c6ad9595: name=etcd-1 peerURLs=http://etcd-1:2380 clientURLs=http://192.168.0.13:2379 isLeader=false
That’s it! The migration is now complete! Here is the resulting scheme of interaction:
Conclusion
This article has described all the complications and pitfalls I encountered during Patroni/PostgreSQL cluster migration to new hardware. The entire process turned out to be quite predictable and controllable (the credit, probably, goes to Patroni). I hope that our readers will benefit from the lessons I learned the hard way.
I managed to keep the downtime to a minimum of 8 seconds. That was due to the load balancer’s health check making three attempts (three seconds apart with a two-second timeout) during the leader switchover to make sure the leader had changed. Fortunately, the service facing the database supported the auto-reconnect feature, so the connection was restored automatically. (Note that it is generally recommended to terminate all connections to a node that is being decommissioned).

Comments